
Now that we have installed and configured Business Central On Premises, let’s see how you can configure and use Visual Studio Code to create an extension.
First, let’s verify the service tier development settings:

Make sure Enable Developer Service Endpoint has been enabled, and make a note of the Port number (default 7049).
Then download and install Visual Studio Code:
https://code.visualstudio.com/

Once Visual Studio Code has been installed (next, next, next,…), launch it and open the Extensions pane:
At the top, search for AL, then the AL Language Extension should popup in the list. Select it and install it. After installation, you will be asked to Reload:

Now you are ready to create your first AL-Extension.
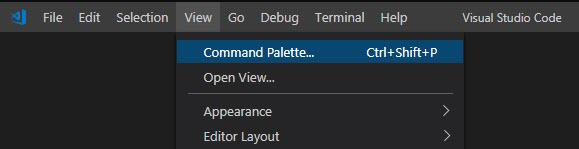
Select View, Command Palette, or type Ctrl-Shft-P:
Then select AL:Go!, or Alt + A, Alt + L:

Now select or enter the path where you want your extension project folder to be created, then hit enter:

When prompted, select Your Own Server:

You will notice that the Launch.json file is now opened, with the following settings:

Change these, so that it points to your local Business Central On Premises instance, like for example:

Then save the file (Ctrl+s) and select Download Symbols in the Command Palette:
Before we can Publish our extension, we need to enable the translation feature. Go to the app.json file and add:


Let’s see what happens now:
Normally, your extension should be published, your browser should open and you can go to the Customer List in the application. But every now and then something might be wrong. For example, when I tried it recently, nothing happened when I pressed F5. The only thing I could see was this:

But the browser did not open, and nothing was published.
Hmmm, what could be wrong???
Well, first verify that your PublicWebBaseUrl has been set correctly in your service tier settings:

If it’s not set, then set it and restart your service tier.
Alternatively you could also do this in PowerShell:
Get-NavServerConfiguration 'MicrosoftDynamicsNavServer$DynamicsNAV130' -AsXml
Set-NAVServerConfiguration 'MicrosoftDynamicsNavServer$DynamicsNAV130' -KeyName 'PublicWebBaseUrl' -KeyValue 'http://localhost:8080/dynamicsnav130'
Ok, I did that, tried to publish again, with the same result: nothing happens…
Hmmm, ok, now we need some extra debug info.
Go to your app.json and add:

This will allow us to publish using F6:

And by doing so, it will reveal extra information in our OUTPUT pane:

So it seems that the NetFx40_LegacySecurityPolicy setting in the Microsoft.Dynamics.Nav.Server.exe.config file is set to true. Let’s set it to false:
You can find the file here: C:\Program Files\Microsoft Dynamics 365 Business Central\130\Service
![]()
More information about it is available here:
https://docs.microsoft.com/en-us/dynamics365/business-central/dev-itpro/developer/devenv-debugging
Restart your service tier.
Now try F6 again, and see what happens:


Whoop whoop, it works now. And of course, it will also work using F5:


Also, remember that to be able to publish an extension, you will need to have license that allows you to do so…

Then, since we are developing for Business Central On Premises, we can set the Target to Internal, in the app.json file:


Extra information and tips & trick can be found here:
- https://docs.microsoft.com/en-us/dynamics365/business-central/dev-itpro/developer/devenv-json-files
- https://docs.microsoft.com/en-us/dynamics365/business-central/dev-itpro/developer/devenv-object-ranges
- https://docs.microsoft.com/en-us/dynamics365/business-central/dev-itpro/developer/devenv-get-started
- https://www.yammer.com/dynamicsnavdev/
- https://github.com/microsoft/al
- https://github.com/microsoft/alappextensions
Get Trained:
- https://plataan.tv/en/plataan/training-course/business-central
- http://create.sendtex.com/121/?m1=4e1dlxf0ydoxealdyoypxylbxfe7&m2=13d5

Discover more from think about IT
Subscribe to get the latest posts sent to your email.
Pingback: How Do I: Develop an Extension in Business Central Saas? – think about IT
Pingback: Business Central – Extension | PA