In this video I explained how to setup and configure the PowerBI.com Content Package for Microsoft Dynamics NAV 2016. Since then I have received a lot of feedback and questions from the community on how to get it to work with a local NAV 2016 instance.
Well, imagine that you have NAV 2016 running on your local machine, for example your laptop. First make sure that your ODATA Services are enabled and running:
And verify it in your browser:
My laptop is named thinkaboutit and my NAV 2016 is running locally, so I have the following URL:
- http://thinkaboutit:7048/DynamicsNAV90/OData/Company(‘CRONUS%20BELGI%C3%8B%20NV’)/
This is also the URL that you will need to use to connect the Power BI content package to your NAV service.
Now, when you then try to use this URL in the https://powerbi.microsoft.com website in the Dynamics NAV content package, with windows authentication, it will time out or give an error.
To fix this problem you can download and install the Power BI Gateway.
- You can find it here: https://powerbi.microsoft.com/en-us/gateway
After you download and install the Power BI Gateway, you need to run it. It will ask you for your windows live id. Use the same one that you use on the Power BI website. After a while, a couple of minutes, it will launch and run in the background. If it does not, it might be because SQL Server Analysis is not running on your machine, make sure it does:
This is because the gateway also allows you to connect with an on premise Analysis Services instance (cubes).
Ok, now that the Power BI Gateway is up and running you are ready to go.
Goto the Power BI website, and use the content package for Dynamics NAV:
You can do this by following the same steps in the video. But instead you will use windows authentication 🙂
It takes a couple of minutes to load the data,
but then it’s ready and shows your local NAV 2016 data in the content pack:
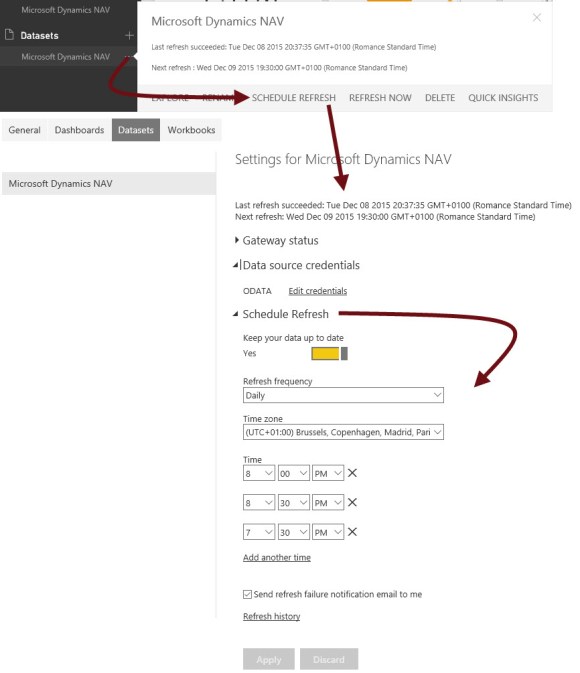
You can verify in the dataset settings that it is using the Power BI Gateway connected to your machine, and did I mention that you can schedule an automatic refresh?:
That’s how easy it is, awesome, no?
Here you will find some info if you encounter any errors:
Discover more from think about IT
Subscribe to get the latest posts sent to your email.


Pingback: Connecting the Power BI Dynamics NAV Content Package to a local NAV 2016 instance - Microsoft Dynamics NAV Community
Pingback: Connecting the Power BI Dynamics NAV Content Package to a local NAV 2016 instance - think about IT - Dynamics User Group
(I updated the screenshots and added an example of how you can schedule an automatic data refresh.)
Pingback: Connecting the Power BI Dynamics NAV Content Package to a local NAV 2016 instance | Pardaan.com
Steven,
I followed your instructions but can’t get PowerBI.com to work with NAV 2016. One thing that I don’t understand is how PowerBI.com can find the OData service on your laptop using your computer name. My understanding is the OData service must be published to internet using a domain name like “nav2016.domainname.com:7048”. Do I miss something? Thanks.
Hi Kevin,
Do you get an error message (see also in the eventlog), and do you have the gateway installed and running? I did not use a domain name and it worked.
Thanks for the great instructions in this post. I followed them and have got the Power BI Gateway Enterprise connected. However I’m getting an error creating my Data Source in the Gateway:
“Invalid connection credentials”
If I look at the detail button on the error I see under “Underlying Error Message” section it says:
Credentials Required to connect to OData Source.
I’m using Authentication Method = Windows and a valid domain login. Any ideas what I’m missing?
Pingback: Power BI With Dynamics NAV - Demo Install | Stoneridge Software Inc
It does not work now. Power BI does not have Power BI Gateway Enterprise on their website for download now. It changed to On-premises date gateway. I followed your instruction and use the Windows authentication, it says “Failed to update data source credentials:InstanceNotRegistered”. On Power BI website, they have the information, it must use Basic authentication and must use https for URL instead of http.
I had the same problem and I managed to find the solution: replace SERVER NAME with its IP ADDRESS and it will work!